
Whether you are a professional penetration tester or want to be become one, having a lab environment that includes a full Active Directory domain is really helpful. There have been many times where in order to learn a new skill, technique, exploit, or tool, I’ve had to first set it up in an AD lab environment.
Reading about attacks and understanding them at a high level is one thing, but I often have a hard time really wrapping my head around something until I’ve done it myself. Take Kerberoasting for example: Between Tim’s talk a few years back, Rob’s posts, and Will’s post, I knew what was happening at a high level, but I didn’t want to try out an attack I’d never done before in the middle of an engagement. But before I could try it out for myself, I had to first figure out how to create an SPN. So off to Google I went, and then off to the lab:
- I set up MSSQL on a domain connected server in my home lab
- I created a new user in my AD
- I created a SPN using setspn, pairing the new user to the MSSQL instance
- I used Empire to grab the SPN hash as an unprivileged domain user (So cool!!)
- I sent the SPN hash to the password cracker and got the weak password
The series so far:
Selecting Your Virtualization Stack

QUESTION: Should I build this in the cloud or on premises?
Before we can get to any of the hacking, we need to talk about where you are going to install your virtual environment. In fact, your home lab doesn’t even need to be located within your home. I’ll give an overview of each option, but the decision will likely be influenced by what hardware you having lying around, how much you want to spend up front, and how much you will be using your lab. In the end, you might even want to try more than one option, as they all have distinct benefits.
Cloud Based
- Hardware
- No hardware purchases
- OS Licensing
- No Windows OS software purchases
- No expiring Windows eval licenses
- Hourly Pricing
- You only pay for the time you use the lab machines
- Education
- You will learn a lot about the cloud stack you are building on
Cons
- Cost
- Leaving your instances running gets pretty expensive. Four windows servers (t2.micro) running 24/7 will put you at around 45 bucks a month
- Keeping track of instances
- If you don’t want them running all the time, you will have to remember to shut down instances when not in use or configure CloudWatch to do that for you
- You can’t pause instances
- In AWS at least, you can’t pause VMs like you can with virtualization software. This is pretty annoying if you are used to pausing your VM’s at the end of each session and picking up where you left off
- Limited Windows OS Support
- No Windows 7/8/10 images (might be AWS specific)
- Some testing activities need to be approved
- You’ll have to notify the cloud provider if you want to attack your instances from outside your virtual private cloud (VPC)
AWS Math
2 Windows instances, 1 Kali instance

Annual cost if you use your lab 30 hours a month on average: $112/year.
4 Windows instances, 1 Kali instance
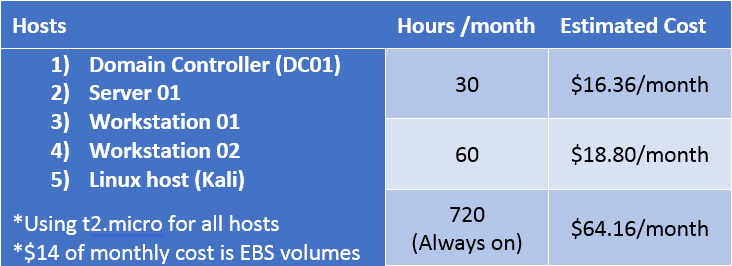
These are just estimations. You can save money by choosing a smaller volume size at instance creation, keeping your Kali instance local, and by tearing down and rebuilding some or part of the environment if you feel like you don’t need it for a few months.
Also, as you can see, the difference in EC2 costs is pretty extreme if you leave your instances running all the time. Remember to turn off those instances when not in use!
One caveat with building your lab entirely in the cloud, at least with AWS, is that AWS does not offer an AMI for Windows 7/8/10. While it appears possible to use your own Windows7/8/10 image, now you are back to either using eval licenses or paying for them. While doing research for this blog series, I came across something called AWS workspaces, and even that does not use 7/8/10. It simulates a desktop environment using Microsoft’s Desktop Experience via Windows Server 2012.
On Premises
Using your Desktop/Laptop
Pros
- Mobility
- Take your lab with you wherever you go (if you have a laptop)
- Easy entry
- You probably already have a Desktop/Laptop that you can use
- Free Options
- VirtualBox and VMware Workstation Player are free
Cons
- Cost
- VMware Workstation Pro (windows) and VMware Fusion (mac) are not free
- Hardware Limitations
- Your current desktop/laptop might be limited in how much memory you can add to it
- Shared Resourcing
- You are competing for shared resources on your host OS. This might not be acceptable
- Every time you need to reboot your host OS, you have to stop/pause all of your VMs
Using a Hypervisor
- Flexibility
- With dedicated hardware, you can isolate the lab on it’s own network, VLAN, etc.
- Software cost
- There are plenty of free options when it comes to Hypervisors
- Options
- You can take advantage of things like KVM, containers, and thin provisioning
- Portability
- If you use something small like an Intel NUC, your lab can be portable
Cons
- Energy Inefficient
- The last thing anyone who reads this post needs is yet another computer running 24/7 😉
- Cost
- Unless you have something laying around already, you’ll have to buy new hardware
- Vendor Specific Knowledge
- Do you have the time and desire to learn all of the hypervisor specific troubleshooting commands when something breaks?
Great Home Lab Resources
My new home lab setup by Carlos Perez
Building an Effective Active Directory Lab Environment for Testing by Sean Metcalf
Intel NUC Super Server by Mubix
Over the years I’ve played with a few of the popular Hypervisors, and here are my thoughts:
Vmware ESXi – My first lab was ESXi. If you’ve never used it, I recommend using this as your Hypervisor if for no other reason than it is ubiquitous in the enterprise. You will find ESX on every internal pentest, and having experience with it from your home lab will help you one day.
Citrix Xen – Eventually my ESX hard drive failed. After reading this post by Mubix, when I rebuilt, I tried Citrix’s Xen Server. I liked Xen, but I quickly ran out of space on my 512G SSD, and when I added a second drive it started to freak out. The amount of custom Xen commands I had to learn was getting out of control, and I didn’t feel like the experience was going to help me all that much so I pulled the plug and looked for something new.
Proxmox VE – For my third iteration, I’m using Proxmox VE, after my friend @mikehacksthings gave a presentation on it at a recent @IthacaSec meeting. I really like it! Thin provisioning means it uses a lot less resources, and it seems lightning fast compared to ESXi and Xen. It definitely has my stamp of approval so far.
In an upcoming post, I’m going to write in detail about building your AD lab on premises using Proxmox.
Getting Windows Server Software
- Required – Windows Server (2012 or 2016)
- Optional – Windows 7 (or 8 or 10)
- Download evaluation versions, which are good for 180 days.
- See if your workplace has a key/iso that can be used in a lab environment.
- Go with a cloud solution like AWS or Azure where the licensing costs are built into your hourly rate.
- I think if you are a student you can get the OS’s for free.
For more detail on these options, check out Sean Metcalf”s blog post: Building an Effective Active Directory Lab Environment for Testing. You will also notice that Sean gives some really useful breakdowns of what he feels you need in an AD lab. I’m going to keep this series more basic than that, but I encourage you to read his post.
Let’s create a Domain
Pentest Home Lab – 0x1 – Building Your AD Lab on AWS
Pentest Home Lab – 0x2 – Building Your AD Lab on Premises (Coming Soon)
Wrap-Up
Feedback, suggestions, corrections, and questions are welcome!